How to Clean a Dr. Brown’s Deluxe Bottle Warmer
This post may contains affiliate links. As an Amazon Associate, I earn from qualifying purchases. Read the full disclosure here.

How do you clean a Dr. Brown’s Deluxe Bottle Warmer? That was a question I was asking myself after I couple failed attempts to eradicate a weird spoiled milk smell that turned up in our kitchen a few weeks after our baby was born.
I didn’t even realize the smell was emanating from the bottle warmer at first. It’s hard to identify a new smell in your house when you have a newborn, because let’s be real, babies are kind of gross and smelly in general.
Admittedly, I had no idea that I had to clean a Dr. Brown’s bottle warmer at all. I had gotten ours used and cleaned the outside of it, never thinking that I somehow had to clean the innards of the machine as well. So by the time ours started smelling, there was no way of knowing how long it had been since it was actually cleaned.
As I came to find out, you should clean your Dr. Brown’s bottle warmer about once a month, or more frequently if it starts to get funky. I first attempted to just clean the water reservoir on the outside with soap and some rigorous shaking but this didn’t touch the smell. I realized I had to actually figure out how to clean the thing properly.
Below you’ll find the results of my personal experience experimenting with how to clean our Dr. Brown’s bottle warmer.
I hope that this spares other bottle warmer newbies from a gross smelling warmer. Now, let’s turn to a rundown of the importance of cleaning your Dr. Brown’s bottle warmer and the steps to take to actually do it.
[NOTE: Since this post was written, Dr. Brown’s now offers different versions of their bottle warmer. This guide is for the deluxe version with an outside water reservoir. The new MilkSpa model and Insta-Feed model look much easier to clean. I’m leaving the post up for those with the deluxe model.]
How to use a Dr. Brown’s Deluxe bottle warmer
Admittedly, I campaigned for us to skip using a bottle warmer all together. I feared our baby getting a taste of the finer things and refusing a bottle anytime we were away from the bottle warmer. This didn’t happen and I ended up really liking our Dr. Brown’s bottle warmer since it’s easy to use (albeit not not exactly intuitive on the cleaning front).
The way the Dr. Brown’s deluxe bottle warmer works is you fill a small reservoir tank of water on the outside of the machine. You pop the bottle in the top of the warmer and when you turn it on, it heats up enough to turn a small amount of water into steam. The steam fills the bottle holding area and heats up the bottle.
Apparently the Dr. Brown’s deluxe bottle warmer can also be used to heat baby food jars but we never tried to do that.
How Long To Heat a Bottle in a Dr. Brown’s Bottle Warmer
You can adjust how long you heat the bottle using a timer on the base of the machine. Smaller amounts of milk/formula need less time heating. Once you set the timer, it defaults back to that time (until the machine is unplugged). The amount of time to heat the bottle will vary based on plastic vs. glass bottles, room temperature vs. refrigerated milk, and milk volume.
Here is a chart of suggested bottle heating times based on Dr. Brown’s instructions:
| Volume | Temperature | Plastic Bottle | Glass Bottle |
| 2 oz. | Refrigerated | 3:00 | – |
| 4 oz. | Refrigerated | 3:55 | 2:50 |
| 8.5 oz. | Refrigerated | 5:00 | 4:20 |
| 2 oz. | Room Temperature | 2:10 | – |
| 4 oz. | Room Temperature | 2:30 | 2:00 |
| 8.5 oz. | Room Temperature | 3:00 | 2:30 |
For a more detailed chart see the Dr. Brown’s manual here.We found their recommended times made hotter bottles than we wanted so we stuck with warming our bottles (2 oz.) for about two and a half minutes for refrigerated milk in plastic bottles. When we’d occasionally heat in glass bottles, we’d pull them about 15-30 seconds sooner.
After the bottle heats, be careful when pulling it out by the lid because it may feel hot. For us, the top of the bottle would feel hot (you have to grab at the top because of the bottle warmer’s shape) but the lower part where the milk is would be just warm. In generally, a fill of the water reservoir lasted us about 10 cycles, but that will vary based on how long you run it for.
Why Does My Dr. Brown’s Deluxe Bottle Warmer Smell?
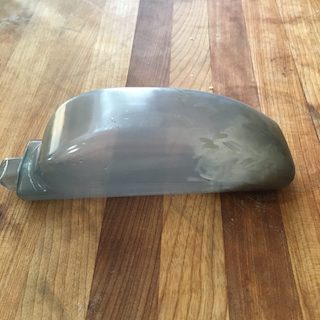
The reason that the bottle warmer will start to smell is that when the bottle is heated, some of the milk also evaporates and ends up settling into the machine when it condenses again. Even with using Dr. Brown’s bottles with their lids firmly on, we still got milk residue in our machine. This milk residue even got back into the water reservoir.
With time and repeated heatings, this milk/formula residue starts to get funky.
Getting this residue out is what makes cleaning a Dr. Brown’s bottle warmer more entailed. The outside water reservoir has a tiny opening, making it difficult to get to the formula detritus that builds up on the walls. Then you also need to clean the internal mechanisms.

How to clean a Dr. Brown’s bottle warmer
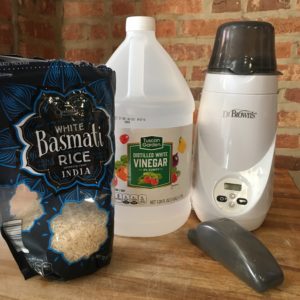
So how do you clean this milk build-up out of your Dr. Brown’s bottle warmer? Dr. brown’s bottle warmer cleaning is actually fairly easy with the right tools, which luckily are common kitchen items – rice and vinegar.
The rice is used to descale the Dr. Brown bottle warmer water reservoir. Rice grains are small enough to fit through the small opening. They act as an abrasive on the walls of the reservoir when you shake it with water.
You run the vinegar through the machine through repeated heating cycles like you would water. This further cleans the reservoir and gets into all the internal chambers in the machine where milk residue hides.
You’ll likely want to clean a Dr. Brown’s deluxe bottle warmer every 4 weeks or so. You’ll know when it is time to clean again when it starts to smell like soured milk (since that’s essentially what it is).
If you get your bottle warmer used like I did, I recommend going through the cleaning protocol below before the first time you use it – learn from my mistake!
Learn more about how I get used baby gear in my monthly baby expenses reports

What you’ll need:
- Rice
- Distilled White Vinegar
- Dish soap (optional)
How to Clean a Dr. Brown’s Bottle Warmer
Total Time: 20 minutes
1. Unplug the machine and make sure it’s fully cooled before cleaning.
You’ll be shaking out all the water in the bottle warmer as a first step so if the water is still hot, it is a burning hazard. I was impatient once and poured a lot of hot water on my hands. Do not recommend.
2. Empty water from the reservoir tank and machine.
First, remove and empty the outside water reservoir. Next take out the plastic basket from inside so it does not fall out when you tip the whole machine over. Then take the whole machine and turn it over a sink to get out any pooled water.
3. Clean the water reservoir tank with soapy water or vinegar.
Squirt some dish soap or vinegar in the water reservoir and fill it about halfway with warm water. Cover the two openings with your fingers and shake it up. If you have a lot of residue, you may want to let the reservoir sit full of soapy water for a few minutes.
4. Pour in a little rice into the reservoir to descale your Dr. Brown’s bottle warmer.
This is the most tedious step in the cleaning process. You are going to put some rice into the reservoir. Don’t worry, the rice comes out easily with water rinses. For me, I essentially had to put the rice in a few grains at a time by hand. It is a pain to get the rice in there but you don’t need a lot.
The rice will essentially scrub and descale Dr. Brown bottle warm water reservoir sides since you since you can’t clean it with a sponge or brush.
Add some water, cover the holes with your fingers, and shake again. You can also add dish soap to this step too.

Rinse out the reservoir thoroughly.
The rice will pour out of the reservoir with water rinses. Fill up the reservoir with water, shake briefly and pour the water out. It likely will take a few rinses to get all the rice out.
Wash the plastic basket components with soap and water.
There is a plastic basket inside the bottle warmer that holds the bottle and is removable. Wash these pieces down with soap and water. If they have a formula film on them, you can soak them in hot soapy water.
Wipe down the inside of the bottle warmer and lid with vinegar.
Wipe down the insides of the machine with a vinegar soaked rag, scrubbing any build-up that is present.
Fill the water reservoir about ¾ full of distilled white vinegar and the remainder of the way of water.
You’ll be running the vinegar through the machine as if you were warming bottles. Put the reservoir tank back into the bottle warmer, plug the machine back in and set it to run.
Run about 4-5 cycles to let the vinegar run through the machine.
Each cycle you run with steam up the vinegar through the machine. It will take about five 5-minute long cycles to use up all the vinegar. Once it is done, your bottle warmer is clean! Fill it back up with water and use normally.
Repeat cleaning about once a month.
Clean the Dr. Brown’s bottle warmer more frequently if you notice milk/formula residue build-up or if it starts to have a smell.
Alternatives to Dr. Brown’s Deluxe Bottle Warmer
Admittedly, cleaning this bottle warm is a bit of a slog. The newer MilkSpa model and Insta-Feed model did away with the outer reservoir that was difficult to clean. Here are so other alternatives to Dr. Brown’s bottle warmer:
- Use warm tap water.
- Try a portable bottle warmer.
- Pull the bottle out of the fridge a little before feeding.
Looking for more on baby feeding gear? Check out 5 Folding High Chairs for Small Spaces.
Pin this post for later!


![Do You Really Need a Baby Bath Tub? [+ Alternatives]](https://shoestringbaby.com/wp-content/uploads/2022/10/do-you-need-a-baby-bath-300x300.png)


